Living in an apartment presents unique water quality challenges that homeowners rarely face. Aging building plumbing, shared water lines, and rooftop storage tanks can introduce contaminants long after municipal treatment has done its job. For apartment dwellers concerned about their family’s health, the water flowing from the tap may carry sediment, chlorine residues, heavy metals, and dissolved solids that affect both taste and safety. Reverse Osmosis filtration has emerged as one of the most effective solutions for tackling these apartment-specific concerns, delivering purified water that meets the highest drinking standards. When paired with complementary filtration stages like PP (polypropylene) pre-filters, an RO system creates a comprehensive barrier against a wide spectrum of pollutants. This article walks you through a clear, step-by-step process for selecting the ideal water filter for apartment use—from assessing your water quality and understanding different filtration technologies to evaluating space constraints, installation requirements, and long-term maintenance costs. By the end, you’ll have the confidence to make an informed decision that protects your household’s health and fits seamlessly into apartment living.
Understanding Your Apartment’s Water Quality Needs
Before investing in any water filter for apartment use, you need to understand exactly what’s in your water. Apartment buildings introduce contamination risks that go beyond what municipal treatment can address. Older buildings often have corroded galvanized pipes that leach lead, zinc, and iron into the water supply. Rooftop storage tanks—common in mid-rise and high-rise buildings—can accumulate sediment, bacteria, and algal growth between cleaning cycles. Shared plumbing means that maintenance issues in one unit can affect water quality throughout the building.
The most common contaminants apartment residents encounter include visible sediment particles, chlorine and chloramine residues that cause unpleasant taste and odor, dissolved heavy metals like lead and copper, and elevated total dissolved solids (TDS). You might notice these issues as a metallic or chemical taste, cloudy appearance, white limescale deposits on fixtures, or a sulfurous smell when running hot water.
Start your assessment with a simple at-home water test kit, available at most hardware stores or online. These kits typically measure pH, hardness, chlorine levels, lead, bacteria, and TDS. For a more comprehensive analysis, consider sending a sample to a certified laboratory. Record your results carefully—they’ll serve as the foundation for every filtration decision you make going forward. A household with high TDS and heavy metals needs a very different system than one dealing primarily with chlorine taste and sediment. This assessment isn’t optional; it’s the critical first step that prevents you from overspending on unnecessary filtration or, worse, under-protecting your family with an inadequate system.
Types of Water Filtration Systems for Apartments
The Role of Pre-Filtration: Sediment and PP Filter Essentials
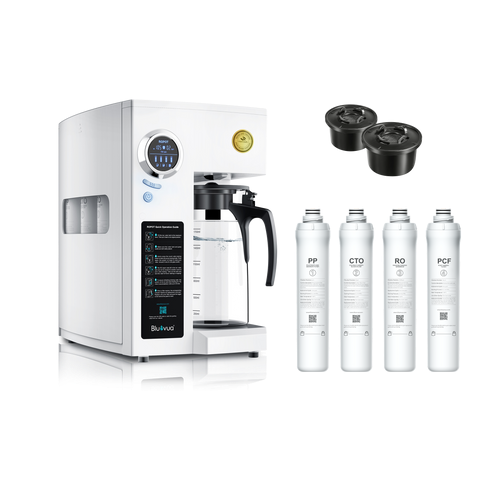
Every effective apartment water filtration system begins with pre-filtration, and the PP filter serves as your first line of defense. A polypropylene filter is a mechanical barrier made from tightly wound synthetic fibers that trap suspended particles as water passes through. These filters typically come in ratings between 1 and 5 microns, capturing rust flakes, sand, silt, dirt, and other visible sediment that apartment plumbing commonly introduces. The removal of sediment at this early stage isn’t just about cleaner-looking water—it’s essential for protecting downstream components, particularly the delicate RO membrane, from physical damage and premature clogging.
Without a quality PP filter in place, larger particles would quickly degrade your RO membrane’s performance and shorten its lifespan significantly. Think of it as a bodyguard for your more expensive filtration stages. From a maintenance perspective, PP filters are among the easiest components to manage. Most require replacement every three to six months depending on your water’s sediment load, and swapping one out typically takes less than five minutes with no special tools. If your apartment building has particularly old pipes or a rooftop tank, you may notice your PP filter discoloring faster—a visible reminder that it’s doing its job and protecting the rest of your system.
Deep Dive: How RO Filtration Works for Pure Water
Reverse Osmosis is the gold standard for comprehensive water purification in apartment settings, and understanding how it works helps explain why. At its core, RO filtration forces water through a semi-permeable membrane with pores so tiny—approximately 0.0001 microns—that only water molecules pass through. Contaminants including dissolved salts, heavy metals like lead and arsenic, nitrates, fluoride, bacteria, and viruses are rejected and flushed away with wastewater. The result is water with up to 95-99% of dissolved solids removed, delivering purity that no other single filtration method can match.
For apartment dwellers, RO addresses the specific challenges of shared building infrastructure. Whether your water carries elevated TDS from aging pipes, traces of pharmaceutical compounds, or microbiological concerns from poorly maintained storage tanks, an RO membrane handles them all. The technology excels at removing contaminants you cannot see, smell, or taste—the invisible threats that basic carbon filters simply cannot address.
Two common concerns arise with apartment RO systems: water wastage and flow rate. Traditional RO units produce wastewater at a ratio of roughly 3:1 (three parts waste to one part purified), though modern systems have improved this significantly to 1:1 or even better. Regarding flow rate, most apartment RO systems include a pressurized storage tank that accumulates purified water, ensuring you have an adequate supply ready when you turn the faucet. Some newer tankless models, such as those offered by brands like Bluevua, use booster pumps to deliver direct-flow RO water on demand, which is particularly useful in space-constrained apartments where every inch of cabinet space matters. The key takeaway is that RO filtration delivers the most thorough water purification available for residential use, making it the ideal centerpiece of any serious apartment filtration setup.
Other Filtration Technologies: Pros and Cons for Apartments
While RO forms the backbone of a robust system, other technologies play supporting roles worth understanding. Activated carbon filtration excels at removing chlorine, chloramine, volatile organic compounds, and the unpleasant tastes and odors that make tap water unappealing. Carbon blocks or granular activated carbon stages are typically integrated before the RO membrane to protect it from chlorine damage while immediately improving water palatability. As a standalone solution, carbon filtration works well for apartments where TDS levels are acceptable but taste is the primary complaint.
UV purification uses ultraviolet light to neutralize bacteria, viruses, and parasites without adding chemicals to the water. It’s an excellent post-RO addition for apartments in areas with known microbiological risks, though it doesn’t remove dissolved contaminants or sediment. Water softeners address hard water by exchanging calcium and magnesium ions for sodium, preventing limescale buildup on fixtures and appliances. However, traditional softeners are bulky, require salt replenishment, and often aren’t practical for apartment installation. In most cases, the ideal apartment setup combines a PP pre-filter, activated carbon stage, and RO membrane—with UV added only when microbiological safety demands an extra layer of protection.
A Step-by-Step Guide to Choosing Your Apartment Water Filter
With your water quality data in hand and a solid understanding of filtration technologies, you’re ready to make a decision. Follow this actionable checklist to narrow down the perfect system for your apartment.
First, analyze your water test results with purpose. If your TDS reading exceeds 300 ppm or your test reveals heavy metals, RO filtration becomes essential rather than optional. If chlorine taste is your only complaint and TDS remains low, a carbon-based system might suffice. Let the data drive your choice, not marketing claims.
Second, determine your required filtration stages based on those results. Most apartment dwellers benefit from a multi-stage approach: a PP filter for sediment removal, an activated carbon stage for chlorine and organic compounds, and an RO membrane for dissolved contaminants. If your building has known microbiological risks, add UV post-treatment to your requirements list.
Third, evaluate your physical constraints honestly. Measure the space under your kitchen sink—height, width, and depth. Under-sink systems offer the cleanest installation but require adequate cabinet space. Countertop units work when cabinet space is limited, while faucet-attached filters suit renters who need zero-modification solutions. Consider whether your apartment has a standard cold water supply line accessible under the sink and a nearby drain connection for RO wastewater.
Fourth, address installation complexity and landlord permissions before purchasing. Many under-sink RO systems require drilling a hole in the countertop or sink for a dedicated faucet, plus a drain saddle connection. Check your lease agreement and communicate with your landlord. Some systems now offer tool-free installation with quick-connect fittings that leave no permanent modifications—ideal for renters.
Fifth, calculate long-term costs beyond the initial purchase. Factor in replacement PP filters every three to six months, carbon filters every six to twelve months, and RO membrane replacement every two to three years. A system with cheaper upfront costs but proprietary, expensive replacement filters may cost more over five years than a pricier unit with affordable, widely available cartridges.
Finally, compare product features and certifications that matter. Look for NSF/ANSI 58 certification for RO systems, which verifies contaminant reduction claims through independent testing. Check the waste-to-pure water ratio, daily production capacity relative to your household size, and whether the system includes a remineralization stage to restore beneficial minerals and improve taste after RO processing. Each of these steps connects directly to your goal: reliable, clean water that fits your apartment lifestyle without unnecessary complexity or expense.
Installation and Maintenance: Ensuring Long-Term Performance
Once you’ve selected your system, installation approach depends on your apartment situation and mechanical confidence. Many modern under-sink RO systems feature quick-connect fittings and color-coded tubing that make DIY installation achievable in one to two hours with basic tools—a wrench, a drill for the faucet hole, and Teflon tape. If your lease prohibits modifications or you’re uncomfortable working with plumbing connections, hiring a professional installer typically costs a modest fee and ensures leak-free operation from day one. Countertop and faucet-attached systems require virtually no installation expertise, connecting directly to your existing faucet aerator within minutes.
Consistent maintenance is what separates a high-performing system from one that gradually fails you. Establish a simple schedule: replace your PP filter every three to six months, as its sediment-trapping capacity diminishes visibly over time. Swap activated carbon cartridges every six to twelve months to maintain chlorine protection for your RO membrane. The RO membrane itself lasts two to three years under normal conditions, though monitoring your TDS output with an inexpensive meter tells you precisely when replacement becomes necessary. If you notice reduced water flow from your dedicated faucet, check whether a clogged pre-filter is restricting supply before assuming a more serious problem. A sudden increase in TDS readings from your purified water signals membrane degradation. Most filter housings simply twist off by hand or with the included wrench, making cartridge swaps a two-minute task that requires no plumbing knowledge. This straightforward upkeep routine ensures your system delivers consistent water purification year after year, protecting both your family’s health and your investment.
Your Path to Clean, Safe Apartment Drinking Water
Choosing the right water filter for apartment living comes down to a handful of critical decisions made in the right order. Start with understanding what’s actually in your water—test it, record the results, and let that data guide every choice that follows. For most apartment dwellers dealing with aging pipes, shared infrastructure, and elevated TDS levels, an RO filtration system paired with a PP pre-filter and activated carbon stage delivers the most comprehensive protection available. Match your system to your apartment’s physical reality by measuring available space, confirming installation permissions with your landlord, and selecting a configuration that won’t require permanent modifications if you’re renting. Factor in the full cost of ownership, including replacement cartridges over several years, rather than focusing solely on the purchase price. Once installed, a simple maintenance routine—swapping pre-filters on schedule and monitoring TDS output—keeps your system performing at its best for years. Investing in proper water purification isn’t just about better-tasting water; it’s a direct investment in your family’s daily health and wellbeing. Take that first step today with a water quality test, and move confidently toward enjoying clean, safe, great-tasting water every time you turn on your kitchen faucet.